Contact:
info@gwcmodela.com
Club Mailing Address:
GWC Club
P.O. Box 971
McLean,VA 22101
Technical Information
- Coolant Notes: New type of antifreeze is causing leaks in brass and lead radiators. The following notes are from club members:
- I'm now use Havoline Conventional antifreeze for older auto and light trucks. This still has silicate, but much lower then the new types.
- I'm using Prime and Advanced Auto Parts antifreeze coolants. They say "Extended life". Neither say OAT/IAT. They are both green.
- Try "Conventional GREEN Formula" "PEAK" Antifreeze & Coolant. Its good for "All Makes and Models: 1989 and earlier"
- CARQUEST makes a house brand antifreeze for older vehicles (ones with copper core/lead solder radiators).
- Any conventional green antifreeze, whether PG or EG based, would be good to use in older vehicles. Most nationwide parts store chains carry the conventional green Peak antifreeze. The Sierra may be a bit harder to find, usually NAPA is the only retailer that consistently carries that product.
- Do not use any anti-freeze that is orange, or labeled extended life, or OAT (or H-OAT, N-OAT) these types of anti-freeze can attack lead, copper, Babbitt and traditional seals and gaskets. The only type that should be used in our Model A's or other vintage cars is Traditional Green anti-freeze. There are many brands out there including; Prestone Prime Conventional Green, Peak Green, Sierra, Zerex Traditional, Carquest Conventional Green, Polar Green. Look on the label for the words Green or "safe for older automobiles".
- I too had questions about which products were IAT. Those letters stand for "Inorganic Additive Technology". OAT on the other hand is "Organic Acid technology". It's frustrating that you can't find any info regarding which type an antifreeze is on the jug. I called Prestone and was told that none of their yellow-bottle antifreezes were IAT, but their "Prime" with the GREEN cap is their only product which is IAT. It was noted that Prime comes with other color caps too and none of them are IAT. I had also checked on Advance Auto's "Carquest" antifreeze with the GREEN cap and found that it is IAT too.
- Remove a stuck Head:
- Start the engine and warm it up to operation temp. Turn off the engine and back off the head bolts. Do not take them off. Crank the engine over a few times with the ignition off. Use a sharp putty knife and drive it between the block and head. Apply penetrating oil in the holes made by the putty knife. Clean around the bolt holes and add penetrating oil around the bolts. Keep cranking the engine and using the putty knife and penetrating oil until it pops up. If this does not work try driving a small screw driver between the block and head but be real careful not to damage the block and head. Move around the engine doing this until it pops.
- A home made tool consisting of two old spark plugs with the porcelain removed and bolts stuck up through the holes in the plugs will provide a pulling force if a piece of angle iron is mounted on top of the studs and the spark plug bolts threaded through matching holes in the angle iron. Tightening the nuts screwed onto the spark plug bolts puts downward pressure on the studs and upward pressure on the head.
- Spoke spacing on wheels for fine point judging
- The article by Steve Schmauch is in The Restorer March/April 2012, pp 12-14.
- To measure the different outer rim spoke spacing in the 30-31 rims a small paper stock card is suggested.
- The four different spacings between groups of three spokes are: 30 KH mm, 35 KH mm, 38 Ford mm, and 43 mm Ford.
- The article indicated we should check 5 or 6 of the spaces on each rim as some variation in spacing occurs. Read the gage that exactly fits or best fits multiple spaces on the outer rim to define the manufacturer of the rim. Your 2 options are KH (Kelsey Hayes) or Ford.
- The 35 mm KH time period of use was 1/30 to 4/31. Other three sizes were used 1/30 to end of Production.
- This check is only necessary for fine point judging. If you already have a straight set of painted rims, do not worry about this for tours and parades. The difference is hard to see if you have 35 mm and 38 mm spaces between the groups of three spoke sets.(A 3mm difference.) Observing the difference between the 30 and 43 mm spoke sets is easier.
- A link to a printable gauge is HERE Once printed out, confirm the size is correct as there are variations in different printers.
- Air Filter
- Clutch Plate Adjustment The club received the following question from a member... and then received the following answers. Posting for all to see.
- You may have to pull the transmission and clutch assembly. There is a torque for those bolts. Someone must have not done that.
- I'm certain to do it correctly you need to remove the pressure plate from the flywheel. It is best to pull out to use a gauge to get it to the correct height.
- http://www.santaanitaas.org/wp-content/uploads/2014/08/pressure-plate-adjustment.pdf
- https://www.youtube.com/watch?v=3CHUZTgyf0g
- https://www.fordbarn.com/forum/showthread.php?t=183365
- http://www.fordgarage.com/pages/pressureplates.htm
- Haven't done this on a Model A but, did have a problem on a VW clutch where 2 adjusting screws for the fingers backed out. I adjusted the 2 errant ones to the same number of threads exposed and then re-preened metal into the slots on the screws to hold them. If as you say all are way out you will have to adjust them and try then re adjust and try again until you get good clutch movement. Hope this helps.
- I'm assuming you have tried adjusting the clutch pedal free toe play. If not, this is the first place to go. It should have about one inch toe play (that's free travel before the throw out bearing contacts the pressure plate levers) at the top of the pedal's travel, no more. If there is too much the clutch won't release fully. Since the clutch's fate is iffy at this state any way, you could fudge a little on the clearance to see if it would make a difference. Also inspect the pedal's bushing and the clevis for wear..
It seems unlikely that the adjusting nuts on the levers have backed out. They are all firmly staked in place and can be difficult to loosen, even when the pressure plate is out and on the work bench. If you were able to loosen the nuts, adjusting them equally and taking measurements would be tricky. One or more repeated adjustments would be required to eventually get them all equal, to within .002. The measurement would be 3/4" from the lever to the top surface of the pressure plate
The clutch is covered by articles from Les Andrews in his Model A Ford Mechanic's Handbook and Vol. 9 of the series How To Restore Your Model A. - All six have BACKED OUT so that the clutch does not engage? It sounds more like the clutch disk is just plain worn out. When the pressure plate bolts are "backed out", you cannot RELEASE the clutch. Not only that, they have lock nuts that prevent them from moving. How is the pedal play here, is there an inch of free play in the clutch pedal?
- First, something about how a clutch mechanism works... When the clutch is at rest, the pressure plate is against the disk and all six fingers are approximately parallel to the flywheel face. They will point slightly toward the flywheel if the disk is new, and as the disk wears, they will move toward the throw-out bearing. The throw-out bearing is retracted and NOT touching the fingers when at rest. Pushing the clutch pedal down moves the throw-out bearing forward until it touches the fingers, this is the free-play in the pedal. Pushing further pushes the fingers toward the flywheel and lifts the pressure plate. As the clutch disk wears, the pressure plate moves closer to the flywheel and the fingers move in the opposite direction toward the throw-out bearing as already described: when they touch, the pedal must be adjusted to put free-play back in. Eventually, the disk will wear to the point that the fingers touch the throw out bearing when it is retracted as far as possible, the disk is worn out and must be replaced. The pressure plate is factory adjusted to cause this to happen before the disk facing is totally worn away; this is why the adjustment should not be changed. Changing it may result in burning up the disk and tearing up the flywheel face if the disk is in fact worn out.
Now, if the pressure plate assembly is out of adjustment, usually because somebody has messed with it, this is what I once did to fix one. The evidence of "messing with it"; some fingers touch the throw-out bearing before others did. If the fingers all touch at the same time, it has probably not been altered, don't mess with it.
Take out the floorboards.
Remove the access plate.
Rotate the engine until one arm is directly under the window.
Tighten up the pedal adjustment until you see the arm that is visible is parallel to the flywheel face.
Hold the lock screw and tighten the adjustment until you can feel the pressure plate lift off the clutch disk, then loosen until it touches again. If you look carefully, when the plate touches the disk, you will see the arm start to move away from the throw-out bearing. You want it to just touch it at this point.
Rotate the engine to the next lever and repeat.
Do this for all six levers.
Now adjust the clutch pedal for the one inch of free play. If you cannot get the right adjustment, the clutch disk is worn out and you must replace it.
This should be treated as a temporary fix. When convenient, the disk and pressure plate should be replaced to re-established a known condition and prevent damage.
Again, if the pressure plate adjustment has not been changed, leave it alone! A worn out disk needs to be replaced before it tears up the flywheel face and before it slips bad enough to overheat and burn up. - Towing A club member asking about towing with a dolly and the following were the results:
- If it were me, I would spend the extra $ and use a trailer.
1. trailer is a lot safer, a four wheel trailer will have brakes and braking lights.
2. Less risk of being rear ended.
3. Think about the wear on your differential and rear wheel bearings
4. With a trailer you can drive faster, You shouldn't expect to tow a Model A at any speed other than you normally drive it at.
5. In my opinion, with a trailer it is a lot easier to maneuver at gas and rest stops, especially if you get into a situation where you have to back up.
6. The tie-down on a Tow Dolly is via the front wheels only , if you had to make a sudden stop, that is a lot of momentum stress on the Model A front end given the single axle spring.
7. You should also consider the chance of road debris, a trailer offers more protection.
- You can tow your Model A on a tow dolly but must compensate for the transmission gears continuing to spin even though the transmission is in neutral and the engine turned off. Most of the gears continue to spin but the one that splashes lubricant over the other gears remains motionless because the engine is not running. Some people run the engine until everything is warm, perhaps driving around a little, then load it on the dolly. When you shut off the engine after loading, the lubrication in the transmission stops. After about 100 miles all the lubricant has drained away from the gears, so you must stop and run the engine for a while. If you are going to start the engine while the car is on the tow dolly, find a place where the road is sloping downward at about the same angle as the car is when on the dolly on level ground. Do not go over 50 mph read: http://towtimes.com/standard-transmission-tows/
- Tires A club member asked about buying and mounting tires and the following were the result:
- Buying tires
1. Brattons Auto Parts
2. Coker 1
3. Coker 2
4. Coker 3
5. Coker 4
6. Lucas Classic
7. Mac Auto Parts
8. And then..they have no website..just have to call: A & T Maders Parts in Staunton VA at: (540) 885-0053
9. When I researched this last year, I found that most vendors sold the same brands at the same prices, so it was a matter of which vendor you prefer for the brand of your choice.Some brands are only carried by some vendors, so then it's also a matter of brand preference.
10. Universal Tire - Mounting tires
1. Purcellville Tire at 540-338-6667 Did my Model A and WW2 Jeep tube tires. If you use a liner bring it in.
2. Changing Model A tires yourself is pretty easy, if you use this Rubber Lubricant My bead breaker is available for loan.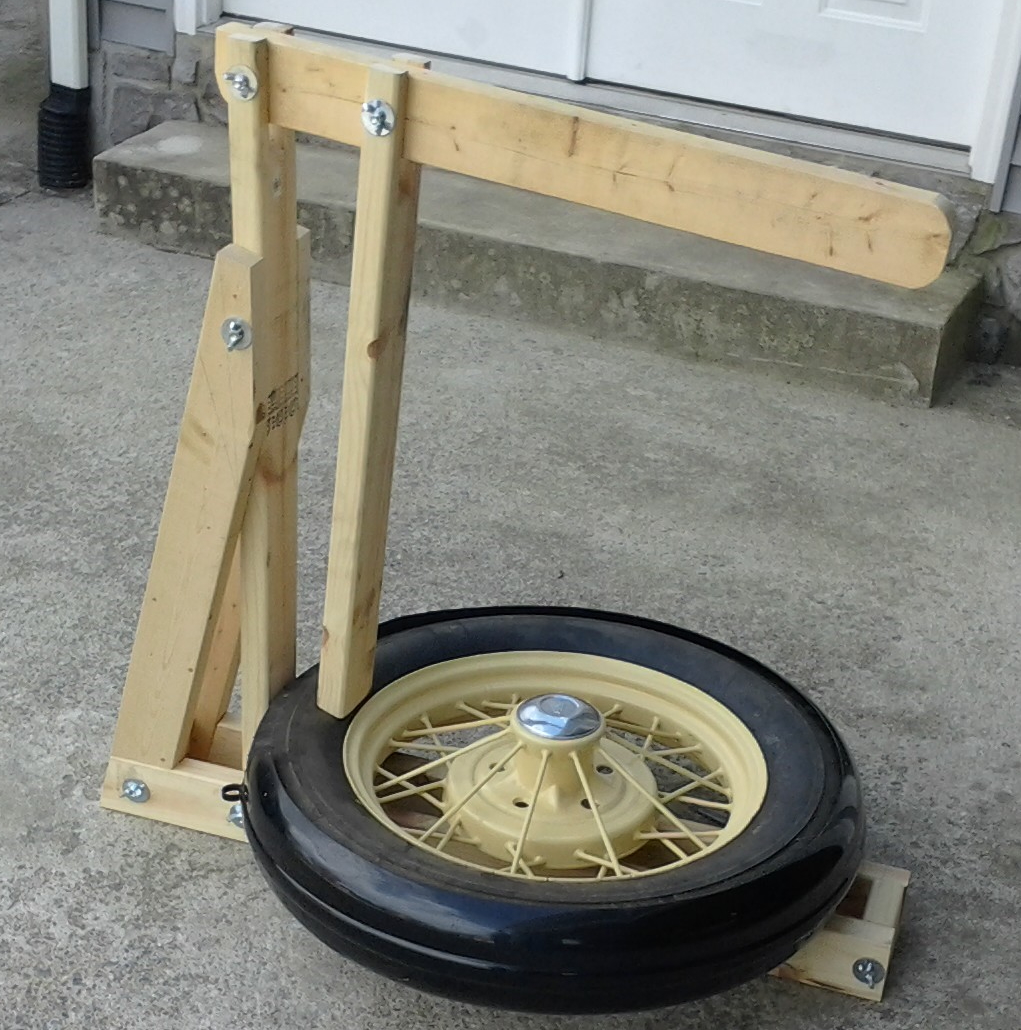
3. I had my tires balanced at Damascus Motors in Damascus MD. Phone 301 253-2151. They have the adapter to spin balance your model A tires.
4. My wife and I mounted our own in the garage by hand, just using a plastic bag to help the tire slide over the rim. I did get the old tires removed by British Standard Motors LLC in Fairfax. They are use to wire wheels.
5. It's not such a big deal. Model A tires can be balanced fairly well by jacking up a wheel, backing off on the brake adjustment and using stick-on weights as follows. (After all, most imbalance symptoms come up at higher speeds that are often not attained by Model A's). Spin the wheel and when it stops the heaviest spot is near the bottom. Work it back and forth a bit to zero it in on the heavy spot. Then, to offset the imbalance place a weight on the top of the rim and turn it 90 degrees to see if the correct amount of weight was added. If the wheel doesn't stay put, adjust the amount of weight as necessary. Re spin and repeat. Ideally the wheel should not be stopping at the same place when repeated a couple times. Of course the front end has to be in good condition too. Slop in it will render balancing less effective. Don't forget to readjust the brakes.
6. Reed's Tire in Luray. They mount/balance everything, and I mean everything. Nice drive too.
7. In Warrenton try Warrenton Tire and Auto that mounts tubes and Merchants Tire in Warrenton does also.
8. I take all my cars to Radial Tire Co in Silver Spring. It's worth the trip, which is not as bad as it might seem for us in Virginia. Living in Arlington, I go through the city and avoid the Beltway. Radial Tire understands old cars, and know how to work on them. I first learned of them when they gave a presentation at a GWC meeting years ago. Not only can they competently install tires on old cars (once when I was there, another car in for tires was a 1920s Rolls-Royce), they can balance Model A wheels. This is difficult not only because of the diameter, but also because the narrow rim confuses balancing machines about which side needs the weight. They also do on-car wheel balancing (a nearly-lost art) which worked wonders on my Morgan (which is very sensitive to wheel balance). You would have to call them about sourcing Model A tires -- they may recommend you buy them elsewhere and bring them (or have them shipped ) to Radial Tire for installation.
9. Us Early V8 guys use Weber Tire in Fairfax. They do tubes and will order tires for you. White gloves and use a torque wrench to tighten lug nuts. Ask for Randy. - Upholstery A club member asked about upholstery and the following are some notes from members:
- Good place to get a top kit would be "Clastique" in Minnesota (call Mike @ 651-484-9022). Have it installed by Joe's Upholstery in Frederick, MD (Don @ 301-662-5006). Don and his family (Wife: Cheryl & son Ron) + crew did a club cabriolet (kit from LBB), which is more complicated task and did a great job! I think Don himself has an 'A' cabriolet or roadster.
- Another recomendation for Joe's Upholstery Shop in Frederick, Maryland. Address: 1003 E Patrick St, Frederick, MD 21701 Phone: (301) 662-5006 The owner is a past member of the GW Model A club. He did some of the upholstery work on a club Victoria. He knows our cars and our standards.
- 600w Oil From a sister club newsletter: Finding a good “600W” gear oil: I wrote to Lubriplate, and they were kind enough to answer the letter and send, at their expense, a gallon of Lubriplate No.8. The technical information sent along says that this is the same viscosity as “old time steam oil, known as 600w.” It can be bought at most industrial supply houses and bearing stores. I get mine from King Bearing, Inc. since they stock it in gallons. A gallon runs $10.95. Lubriplate does not sell direct (retail), but any oil supplier should be able to get this for you. It is a nice, clear produce, not even honey-colored. It has a “cling” additive, and if you open the plug on the transmmission or rear end, you can see the gears covered with a nice film.
- Gaskets and Sealer Partial reprint from the newsletter of the Virginia-Carolina Region of MARC. Article by 'Bill':
- Permatex #1- is fast drying and hard setting.
- Permatex #2- is slow drying and non-hardening High Tack- provides a tacky, non hardening surface useful for sticking gaskets in place
- Shellac- is a very old school gasket sealer, that drys fast and produces a hard brittle seal.
- Ultra Red- is a high temperature sealer useful around exhaust manifolds
- Ultra Black- Is oil resistant and provides a flexible bond
- Ultra Gray- is for high torque and vibration conditions
- Red, Black and Gray also come in an “Optimum form which drys within 90 minutes for very rapid assembly and quick return to service
- Gas tank cleaning without removal From the internet: I use evaporust from harbor freight or tractor supply and Amazon will deliver it. Get 11 gals and leave it in for a few days and drain. If you want to get the flakes out first, I usually pull the shut off valve from the bottom of the tank and remove the floor. Run a hose in it and shake the car a little. Then when you're satisfied, put your valve back on the tank and fill with the evaporust. Drain, rinse and fill with gas after you sit dry to prevent flash rusting. The good thing is evaporust is environmentally safe so when you are done you can pour the liquid into your garden. But since I went full strength with 11 gallons, I saved it all back into their bottles and will reuse it. It's good for a few trips with rusty metal.
- Oil Couple of comments from sister clubs: (High Zinc content racing oil) Valvoline VR-1. Note: There is a huge amount of debate as to whether this $9 per quart oil is really needed in a low compression Model A with a Cast Iron Cam Shaft. Any modern oil you care to use is going to be much much better than what was available when our Model A's left the factory.
- Jump starting using 12v on an original 6v TIP FROM BRUCE HAYNES (Reprinted from The March 2017 Generator, the official newsletter of the Old Dominion Chapter/Region in Richmond) To jumpstart a 6-volt Model A with a 12-volt battery, put the car in neutral, set the parking brake, block the wheels and turn the key on. First, place one jumper cable [it does not matter which one, on the stud on the starter. Next, confirm that the car is in neutral and place the other jumper cable on the frame of the car. As soon as you do that, the starter will engage and turn the engine over. The 12-volt battery will not harm the 6-volt starter unless you crank it for three to five minutes. However, if you jump the 12-volt battery directly to the 6-volt battery, you stand a good chance of a battery explosion.
- O'Reilly Auto Parts Their Blue Streak brand carries a lifetime warranty. List of part numbers for Model A's:
- Points: Blue Streak- O'Reillys Part # FD77
- Condenser: Blue Streak- O'Reillys Part # FD8183V
- Fan Belt: Gates - Part # TR-22434
- Ignition Coil (12V): Import Direct- Part # 23-0240
- Alternator (12V): Wilson- Part # 90-01-3125
- Spark Plugs: Champion W16Y, O'Reillys Part # 561
- Ignition Switch: O'Reillys- Part # US 64 (This is an on/off switch - not a pop out.)
- Oil Filter (if you use one) Motorcraft FL-400S. A smaller one to use is a Motorcraft FL-910
- Build a Distributor Holder
- Battery Maintenance
- Do it yourself wheel straightening
- Rebuild Gas Gauge
- Rebuild Water Pump
-
Personally I wouldn't run any type of air cleaner. Our roads today are so clean the amount of dust you would suck up in 40 years would never wear out that engine. I think if it was necessary
Ford would've put one on there. It's not like air cleaners were not invented back then. And they just didn't see any point in it and still they lasted 80+ years now without one. There are pros
and cons to air cleaners on up draft carburetors. If you have fuel leaks air cleaners can trap them and can cause huge fires instead of just letting it drip on the ground. Air cleaners, no matter
who made it or what type it is, reduce performance by restricting airflow. There are a few good things like obviously cleaner air in dirty environments, along with collecting air away
from exhaust manifold leaks. There's probably more I'm not thinking of. When it comes down to it if you must run an air filter, the carb can be pressure balance to compensate. David at RENNER'S CORNER
I have a pressure plate on my clutch that is out of adjustment and need some assistance.
All of the 6 pressure plate adjusting bolts have backed out enough so that the clutch will not disengage. The bolts are visible after removing the inspection plate on the top of the bell housing.
My best guess is to adjust each bolt to the same depth. It is in such a tight space it is difficult to do.
All gaskets and sealers are not alike. The array of gaskets includes; paper, cork, rubber, silicone, graphite, asbestos, as well as high temperature gaskets use for exhaust, and of course metal head gaskets. Each has it's place. Commonly available gaskets for the Model A include paper, cork, rubber, metal/asbestos. My engine builder prefers to use simple paper gaskets, with no additional sealers whenever possible. Sealers when applied tend to squeeze out, some of this material can be cleaned up from the outside, but the material that squeezes into the inside of the engine can find its way into such places as the oil passages to the bearings. I think I further compounded my mistake by using the wrong type of sealer. Permatex comes in a dizzying array of forms and products:
Pick the weight of the engine oil by the condition of the engine (oil pressure) & the outside temperature. Many folks use 30w detergent all year. A straight weight oil is probably ok in a hot climate, but you will get excessive engine wear on startup in cold climates. (That's one reason multi-vis oil was invented) A worn engine is going to need a heavier weight oil to maintain oil pressure at operating speed & temp. Many use 10w30, 15w40 or even 20w50. Some like the newer diesel rated oil because of the additives for the flat tappets & highly recommend Shell Rotella T 15-40. Increase the weight if the engine has low oil pressure. Switching to detergent oil is not going to loosen up the sludge in the engine. It isn't necessary to add zinc to your oil. The current level of phosphorous (the anti-wear element is not zinc - it is the phosphorus that comes with the zinc in the ZDDP additive) is more than adequate for the valve train on a 23HP low RPM flat tappet engine with 30# valve spring pressures. It is also a little higher than the levels you would have found in the vast majority of 1940-1960 engine oil formulations. The truth is most "old school" flat tappet production engines are perfectly happy at 600-800 PPM phosphorous. And if you have a "high performance" engine that actually needs a higher level of phosphorous you don't have to go to diesel oils to get it. The SL/SM service class limits on zinc/phosphorous only apply to viscosity grades SAE xxW20 and xxW30. An SAE xxW40 grade SL or SM service class oil can have as much as 1400 PPM. Anything much more than that and the zinc and phosphorous will start to chemically eat the metal away accelerating camshaft and tappet wear. So make sure you understand the chemistry and be mighty careful what you are adding to your oil.
 Member of MARC and MAFCA